2.2.7. Install as a VM using Proxmox VE
This chapter explains how to start a Virtual Service Router VM using Proxmox VE and the .iso
file.
It expects that you already installed a Proxmox VE cluster, in which you are able to spawn VMs with network connected.
It follows the following steps:
Prepare the host for high performance
Make the
.isofile available to Proxmox VECreate and configure a VM
Boot the VM using the
.isofileinstall Virtual Service Router on the virtual disk
Purpose of the document
This document will guide you through the required steps needed to provision your Proxmox hypervisor.
Finding SR-IOV capable interface on proxmox
We first need to find interfaces where we’ll activate SR-IOV on, so to proceed we need to log on the PVE server with an admin account (or root if it is the first boot of the server).
root@rome:~#  lspci -v | grep Ethernet
[...]
05:00.0 Ethernet controller: Intel Corporation 82599ES 10-Gigabit SFI/SFP+ Network Connection (rev 01)
            Subsystem: Intel Corporation Ethernet Server Adapter X520-2
05:00.1 Ethernet controller: Intel Corporation 82599ES 10-Gigabit SFI/SFP+ Network Connection (rev 01)
            Subsystem: Intel Corporation Ethernet Server Adapter X520-2
0b:00.0 Ethernet controller: Intel Corporation Ethernet Controller XL710 for 40GbE QSFP+ (rev 02)
            Subsystem: Intel Corporation Ethernet Converged Network Adapter XL710-Q2
0b:00.1 Ethernet controller: Intel Corporation Ethernet Controller XL710 for 40GbE QSFP+ (rev 02)
            Subsystem: Intel Corporation Ethernet Converged Network Adapter XL710-Q2
[...]
Next let’s confirm SR-IOV support. In our example we see that all the NICs are supported.
root@rome:~#  lspci -vvv | awk '/Ethernet/ {device=$0} /SR-IOV/ {print "***SR-IOV enabled***   "device}'


***SR-IOV enabled***        Subsystem: Intel Corporation Ethernet Server Adapter X520-2
***SR-IOV enabled***        Subsystem: Intel Corporation Ethernet Server Adapter X520-2
***SR-IOV enabled***        Subsystem: Intel Corporation Ethernet Converged Network Adapter XL710-Q2
***SR-IOV enabled***        Subsystem: Intel Corporation Ethernet Converged Network Adapter XL710-Q2
To see details, capabilities and required driver for a SR-IOV enabled devices the following command can be used :
lspci -v | grep -B 30 "SR-IOV"
To see details, capabilities and required driver for a certain NIC we can use the following command:
lspci -v | awk '/<PCI BUS>/','/^$/'
Note
We can also see the NUMA node the NIC is connected to.
root@rome:~#  lspci -v | awk '/05:00.0/','/^$/'

        05:00.0 Ethernet controller: Intel Corporation 82599ES 10-Gigabit SFI/SFP+ Network Connection (rev 01)
                Subsystem: Intel Corporation Ethernet Server Adapter X520-2
                Physical Slot: 1
                    Flags: bus master, fast devsel, latency 0, IRQ 16, NUMA node 0, IOMMU group 36
                    Memory at 39ffe080000 (64-bit, prefetchable) [size=512K]
                    I/O ports at 3020 [size=32]
                    Memory at 39ffe104000 (64-bit, prefetchable) [size=16K]
                Capabilities: [40] Power Management version 3
                Capabilities: [50] MSI: Enable- Count=1/1 Maskable+ 64bit+
                Capabilities: [70] MSI-X: Enable+ Count=64 Masked-
                Capabilities: [a0] Express Endpoint, MSI 00
                Capabilities: [100] Advanced Error Reporting
                Capabilities: [140] Device Serial Number 00-1b-21-ff-ff-74-59-04
                Capabilities: [150] Alternative Routing-ID Interpretation (ARI)
                Capabilities: [160] Single Root I/O Virtualization (SR-IOV)
                Kernel driver in use: ixgbe
                Kernel modules: ixgbe
This step only applies if you have multiple sockets on your hypervisor. Ensure the CPUs you pin to the VMs are from the same NUMA node as your NIC
cat /sys/bus/pci/devices/<PCI bus number>/numa_node
root@rome:~# cat /sys/bus/pci/devices/0000\:05\:00.0/numa_node
0
The output above is given as an example, it will differ on each server. Here we have the pci-id’s (05:00…) then the name of each NIC card embedded in the server.
05:00.0 Ethernet controller: Intel Corporation 82599ES 10-Gigabit SFI/SFP+ Network Connection (rev 01)
0b:00.0 Ethernet controller: Intel Corporation Ethernet Controller XL710 for 40GbE QSFP+ (rev 02)
As we need to match this pci-id to the name given by the kernel (eth1 or ens2f0 for example), you can match the “Device Serial Number” of this output, to the MAC address shown through an
root@rome:~# ip a
Or you can grep on system devices pci-id’s like below :
root@rome:~#  ls -l /sys/class/net | grep 0b:00
lrwxrwxrwx 1 root root        0 Nov 12 15:31 ens2f0 ->  [...] 0000:0b:00.0/net/ens2f0
lrwxrwxrwx 1 root root        0 Nov 12 15:31 ens2f1 -> [...] 0000:0b:00.1/net/ens2f1
Activate SR-IOV on proxmox
In order to be able to create VF (Virtual Function) on PF, we first need to enable this technology at boot.
Proceed with updating the grub configuration :
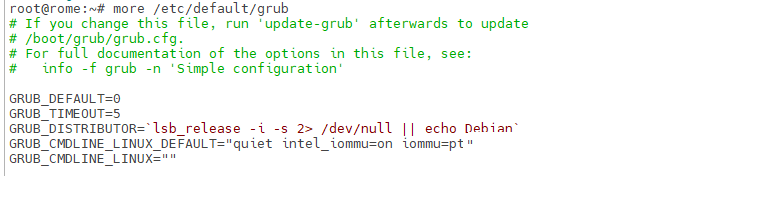
root@rome:~# vi /etc/default/grub
For an Intel processor, modify the 4th line :
GRUB_CMDLINE_LINUX_DEFAULT="quiet intel_iommu=on iommu=pt"
For an AMD processor, modify the 4th line :
GRUB_CMDLINE_LINUX_DEFAULT="quiet amd_iommu=on iommu=pt"
Once done, your file should look like this :
then update the grub configuration :
root@rome:~# update-grub
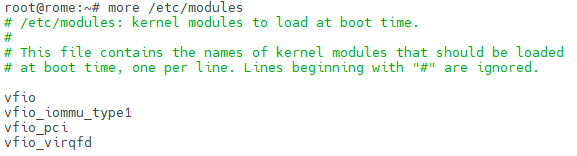
Modify the /etc/modules files to add kernel modules that are required at boot :
root@rome:~# vi /etc/modules
Once done, your file should look like this :
It is necessary to apply the modifications then restart the server :
root@rome:~# update-initramfs -u -k all
root@rome:~# reboot
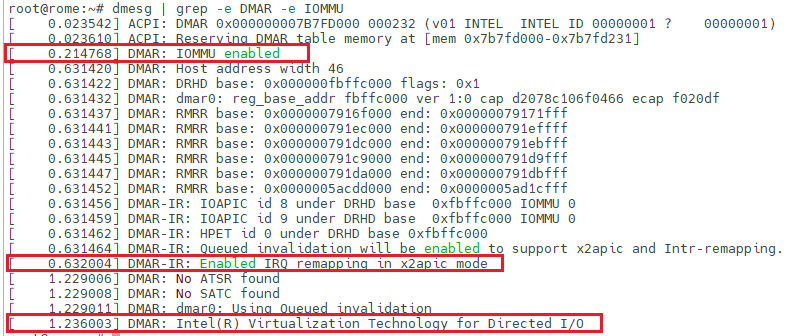
Once rebooted, you should be able to see the IOMMU activation :
root@rome:~# dmesg | grep -e DMAR -e IOMMU
Activate Hugepages mechanism on proxmox
In order to be able to get best performance in VSR VM, it is required to activate 1Gb hugepages. They will be pre-allocated at fast-path starting.
Proceed with updating the grub configuration :
root@rome:~# vi /etc/default/grub
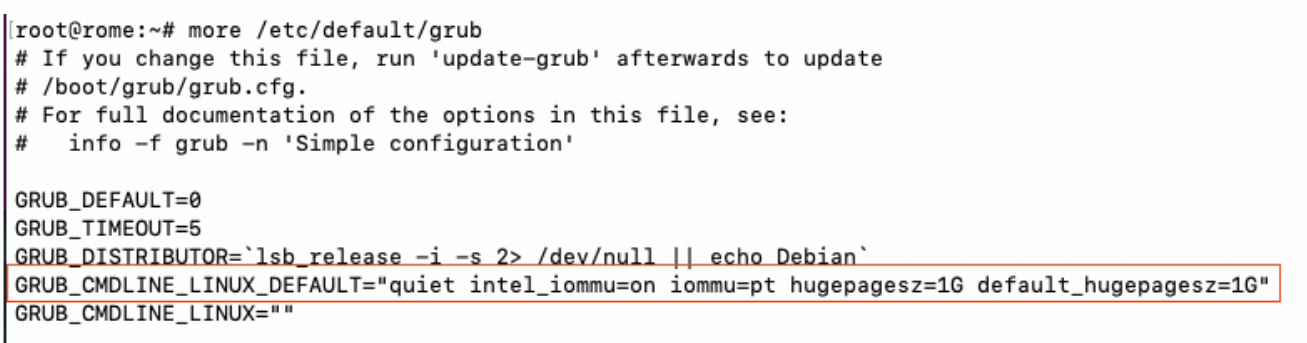
For Intel processor, the modify the 4th line :
GRUB_CMDLINE_LINUX_DEFAULT="quiet intel_iommu=on iommu=pt hugepagesz=1G default_hugepagesz=1G"
For AMD processor, the modify the 4th line :
GRUB_CMDLINE_LINUX_DEFAULT="quiet amd_iommu=on iommu=pt hugepagesz=1G default_hugepagesz=1G"
Grub configuration file should look like this :
then update the grub configuration and reboot the server :
root@rome:~# update-grub
root@rome:~# reboot
Set SR-IOV persistent
As a matter of example we’ll now create 3 VF on the first PF then 5 on the second PF, set their MAC address to always be the same and activate the PF to be UP at each start, so our VM will be able to get network access as soon as they boot up. Without those actions, all VF will be vanished at each reboot.
To proceed we’ll create a fake service that will automatically create VF and set their mac adress at each boot. In order to create the required VF at boot time, edit the following file:
root@rome:~# vi /etc/systemd/system/sriov-NIC.service
Then populate it according to your needs and start the service:
[Unit]
Description=Script to enable SR-IOV on boot


[Service]
Type=oneshot
# Starting SR-IOV
ExecStart=/usr/bin/bash -c '/usr/bin/echo 3 > /sys/class/net/ens1f0/device/sriov_numvfs'
ExecStart=/usr/bin/bash -c '/usr/bin/echo 5 > /sys/class/net/ens2f0/device/sriov_numvfs'
# Setting static MAC for VFs
ExecStart=/usr/bin/bash -c '/usr/bin/ip link set ens1f0 vf 0 mac 02:fe:ed:00:01:00'
ExecStart=/usr/bin/bash -c '/usr/bin/ip link set ens1f0 vf 1 mac 02:fe:ed:00:01:01'
ExecStart=/usr/bin/bash -c '/usr/bin/ip link set ens1f0 vf 2 mac 02:fe:ed:00:01:02'
ExecStart=/usr/bin/bash -c '/usr/bin/ip link set ens2f0 vf 0 mac 02:fe:ed:00:02:00'
ExecStart=/usr/bin/bash -c '/usr/bin/ip link set ens2f0 vf 1 mac 02:fe:ed:00:02:01'
ExecStart=/usr/bin/bash -c '/usr/bin/ip link set ens2f0 vf 2 mac 02:fe:ed:00:02:02'
ExecStart=/usr/bin/bash -c '/usr/bin/ip link set ens2f0 vf 3 mac 02:fe:ed:00:02:03'
ExecStart=/usr/bin/bash -c '/usr/bin/ip link set ens2f0 vf 4 mac 02:fe:ed:00:02:04'
ExecStart=/usr/bin/bash -c '/usr/bin/ip link set dev ens1f0 vf 0 trust on'
ExecStart=/usr/bin/bash -c '/usr/bin/ip link set dev ens1f0 vf 1 trust on'
ExecStart=/usr/bin/bash -c '/usr/bin/ip link set dev ens1f0 vf 2 trust on'
ExecStart=/usr/bin/bash -c '/usr/bin/ip link set dev ens2f0 vf 0 trust on'
ExecStart=/usr/bin/bash -c '/usr/bin/ip link set dev ens2f0 vf 1 trust on'
ExecStart=/usr/bin/bash -c '/usr/bin/ip link set dev ens2f0 vf 2 trust on'
ExecStart=/usr/bin/bash -c '/usr/bin/ip link set dev ens2f0 vf 3 trust on'
ExecStart=/usr/bin/bash -c '/usr/bin/ip link set dev ens2f0 vf 4 trust on'


[Install]
WantedBy=multi-user.target
root@rome:~# systemctl enable sriov-NIC root@rome:~# systemctl start sriov-NIC
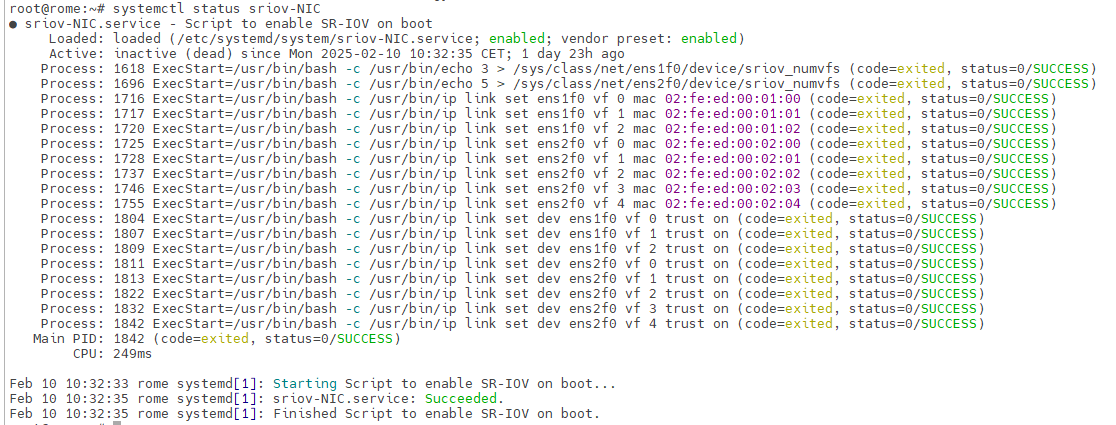
If the service starts without issues you should get such output :
root@rome:~# systemctl status sriov-NIC
Configure SR-IOV interfaces to be started automatically at boot time
Now that all of our VF are created, we can switch to proxmox web view.
In the “Server View”, click on your Proxmox Server name (rome in our case) > System > Network :
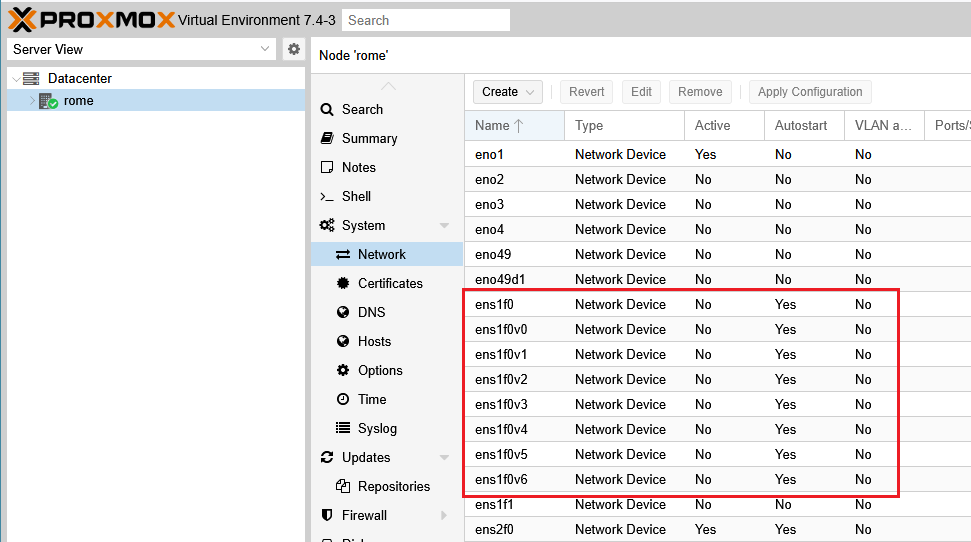
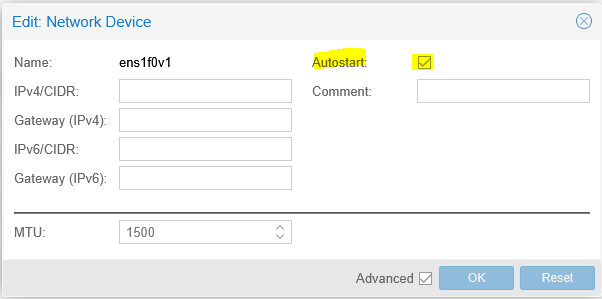
Here we can see the PF and all VF created, double click on each of them and check “Autostart”, then “ok“ :
Consequently those PF/VF will be automatically set to status “UP” at each boot.
You can also verify or apply this setting by modifying the file : /etc/network/interfaces and adding : “auto ens1f0v0” before each statement “iface” :
auto ens1f0v0
iface ens1f0v0 inet manual
Once finished click “Apply Configuration”, the network service will restart to apply new configuration.
Once done you need to update your VM configuration. You can get your VM ID directly from GUI or through command :
qm list
Then update your VSR ID :
root@rome:~# nano /etc/pve/qemu-server/9020.conf

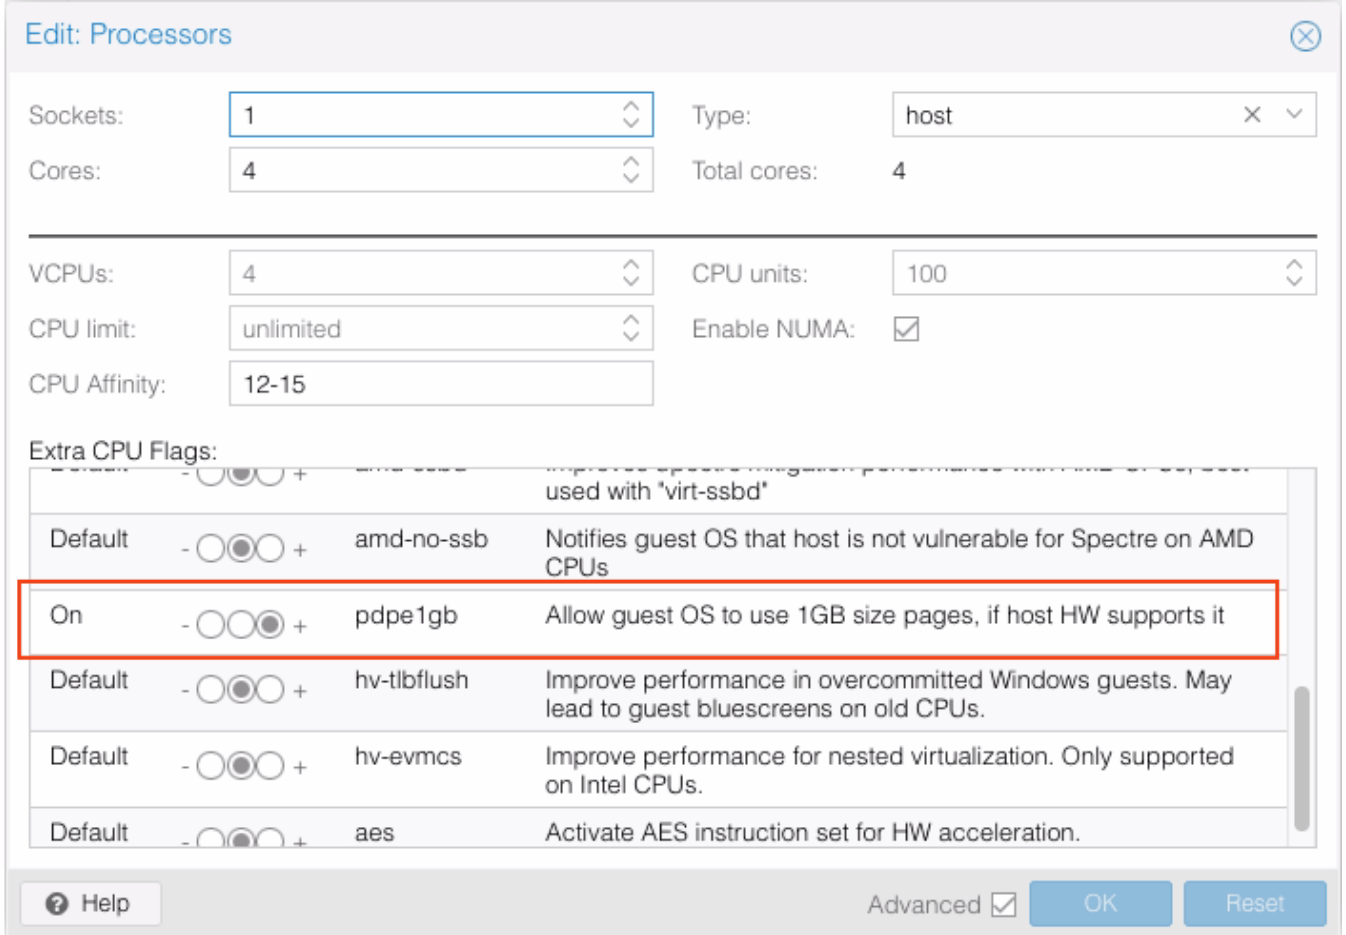
Add “hugepages: 1024” and the flags “pdpe1gb” as described above. Save the configuration then Stop & Start the VM for changes to take effect.
The “pdpe1gb” can also be set into GUI “processors” tab
Now you can continue with the installation of your VM.
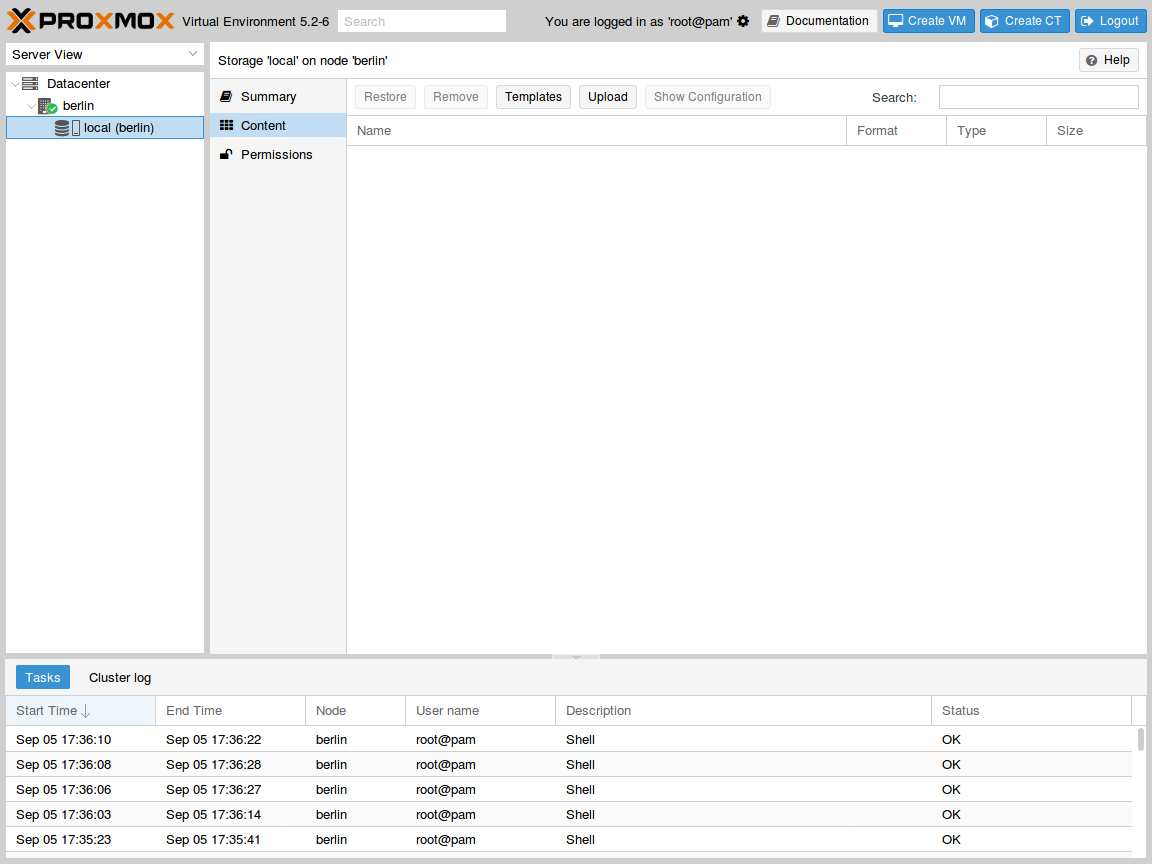
Upload the .iso file
Select the local storage of your node in the left pane and visualize its content:
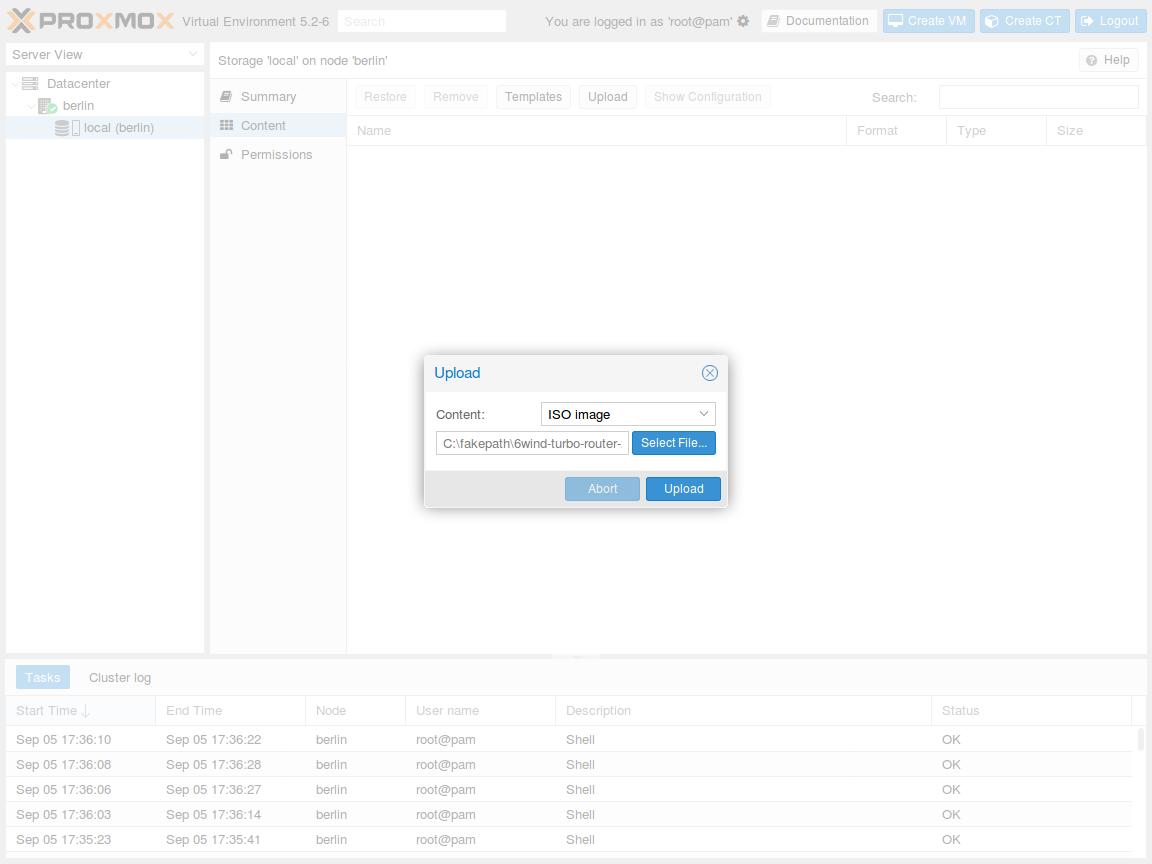
Press the Upload button. In the pop-up window, select ISO image as content
type and point to the Virtual Service Router .iso file on your local disk. Then press
Upload to send this file to your Proxmox VE node:
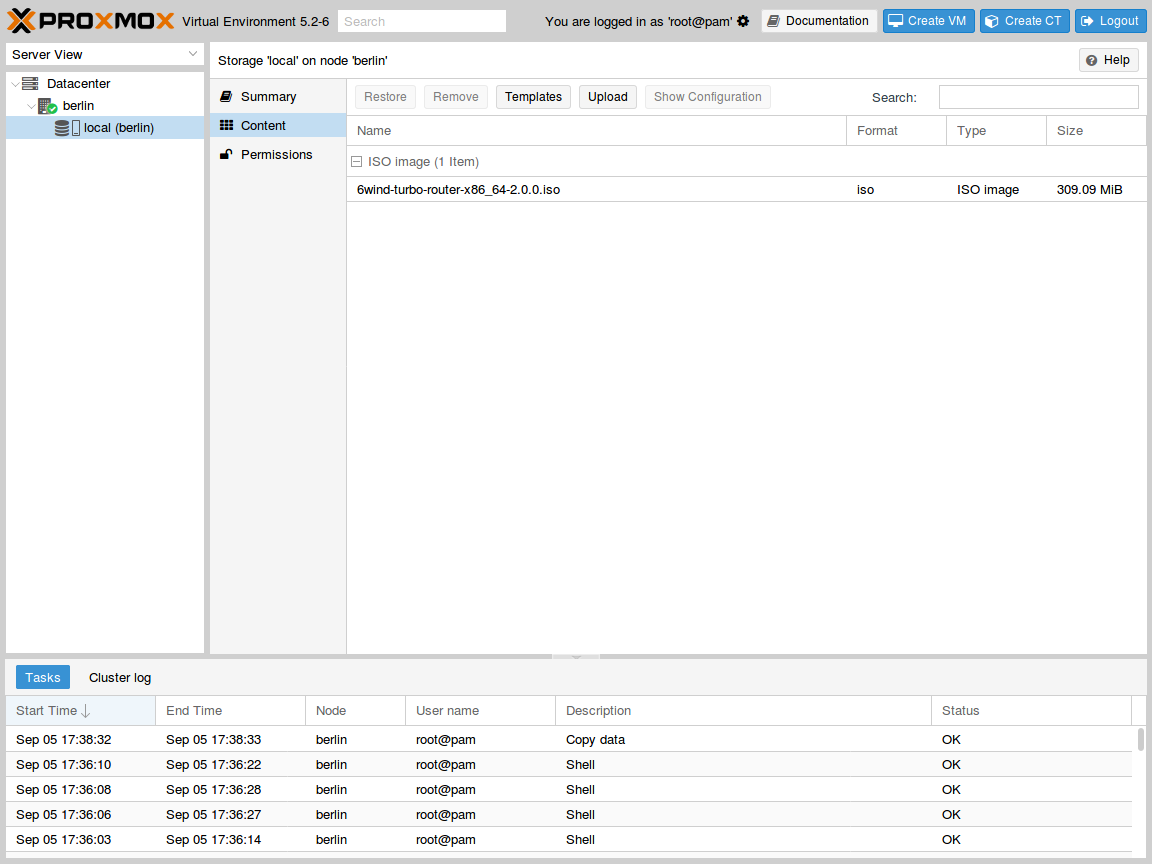
The .iso file is now available to this node:
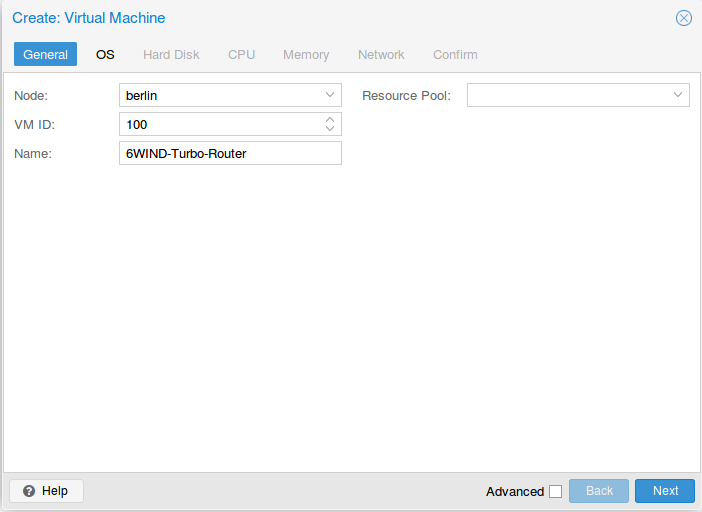
Create and boot the VM
In the top right corner, press the Create VM button to launch the creation
wizard. In General tab, check the node and the VM ID, and give a name to the
VM, then press Next:
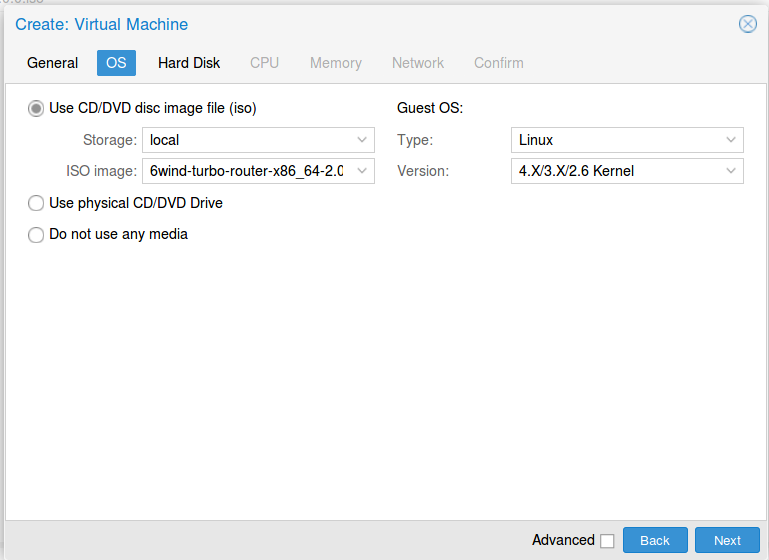
In OS tab, make sure to use the uploaded .iso file as CD/DVD and to specify
a Linux with 4.X/3.X/2.X kernel as Guest OS, then press Next:
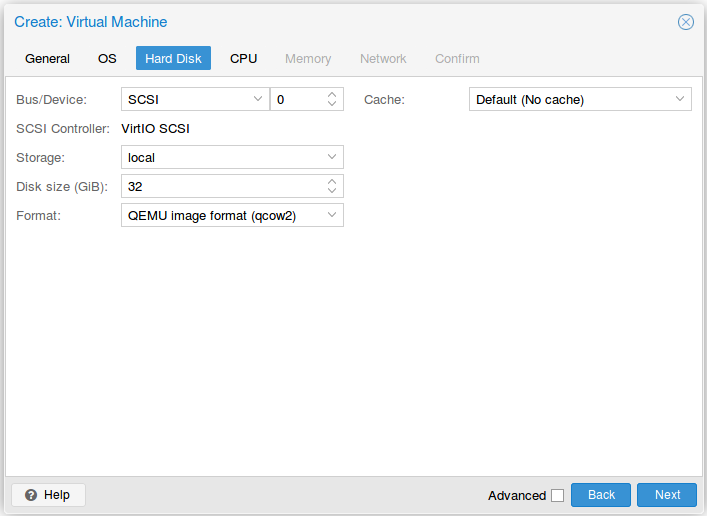
In Hard Disk tab, keep the default qcow2 device with VirtIO SCSI storage and
allocate at least 10GB, then press Next:
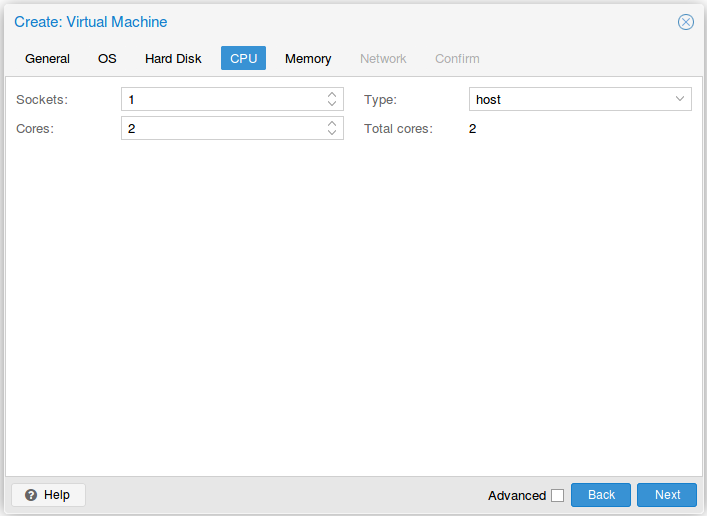
In CPU tab, allocate at least 2 cores and select host as CPU type, then
press Next:
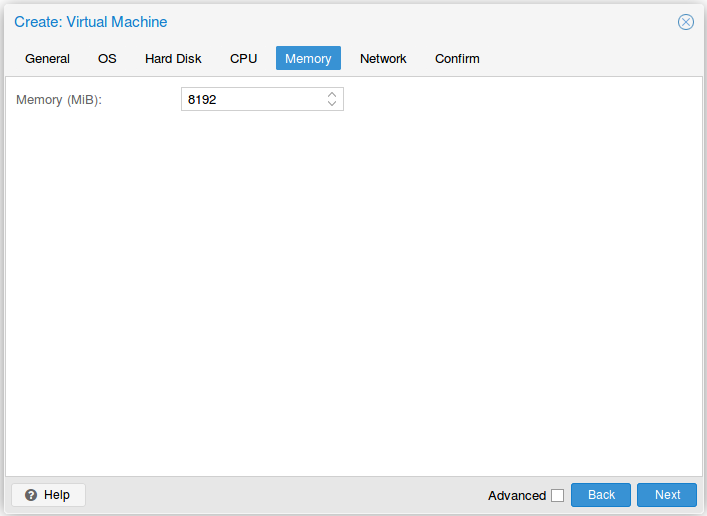
In Memory tab, allocate at least 8GB of RAM, then press Next:
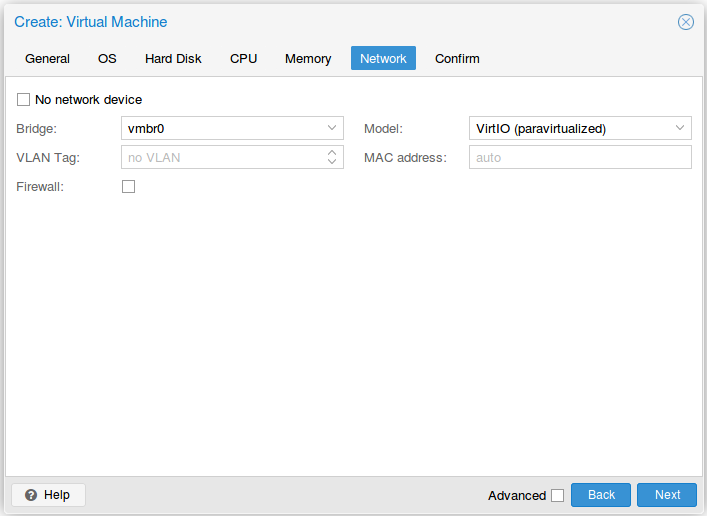
In Network tab, bind the virtual management interface to a host bridge in
order to have access to external network. Select VirtIO as model type, then
press Next:
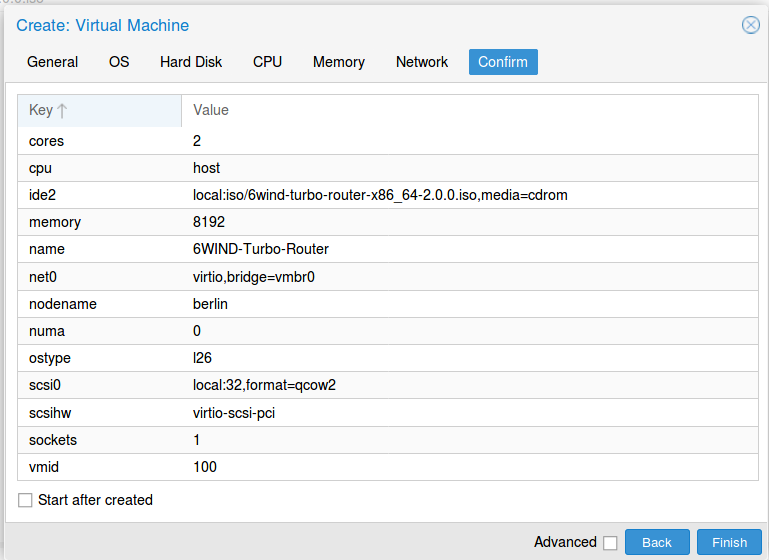
In Confirm tab, review your settings and press Finish to finalize the
creation and get back to the main dashboard:
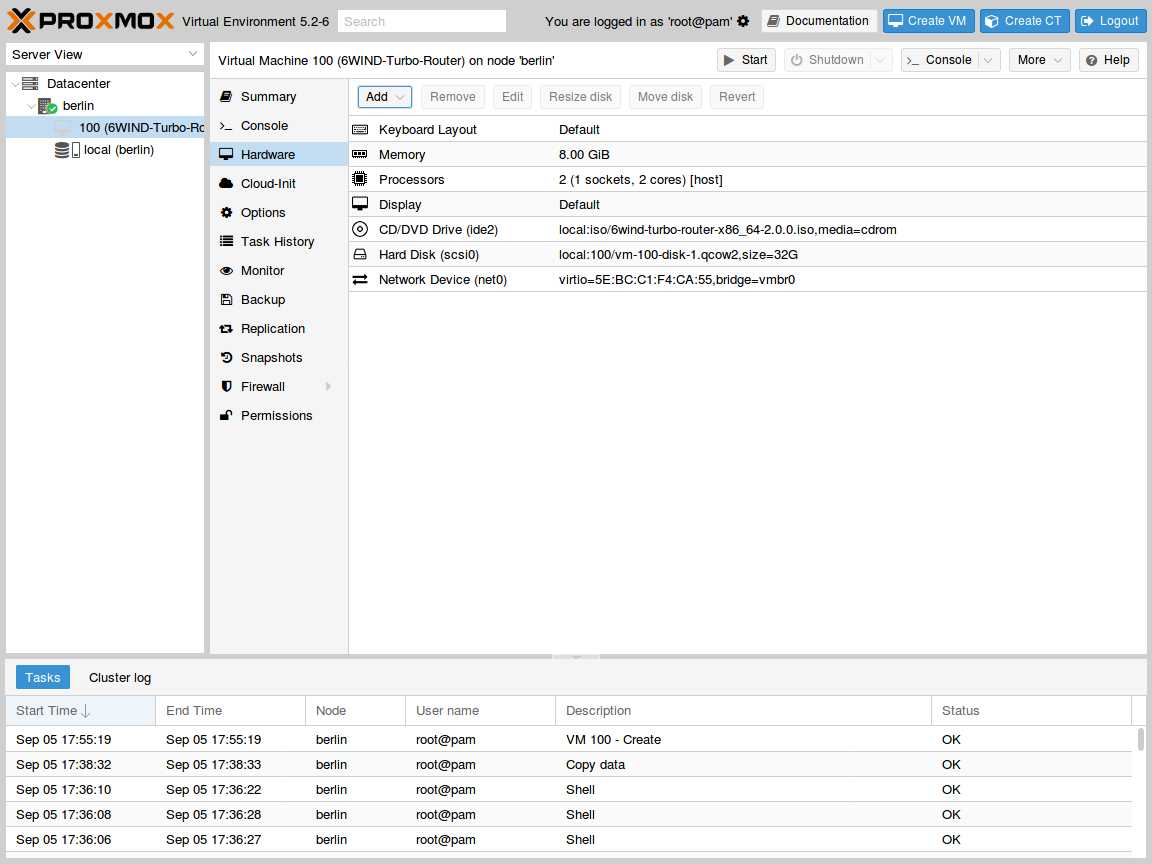
The VM is now available in the left pane below your physical node. Select it and review its hardware configuration:
Press Add > Network Device:
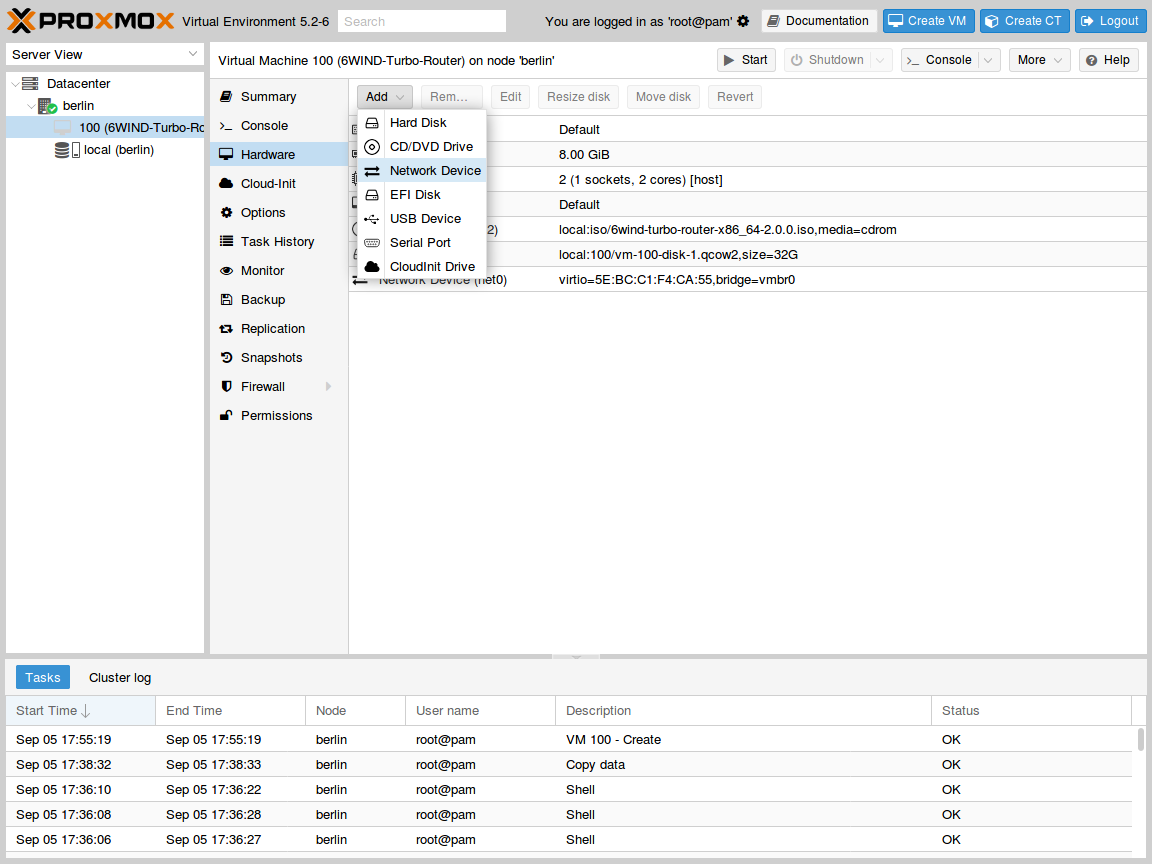
In the pop-up window, select an attachment bridge and choose VirtIO as model,
then press Add:
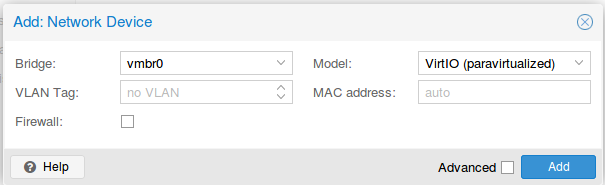
The second network device can now be seen in the hardware configuration of the VM:

Set a VF to be used by a VM
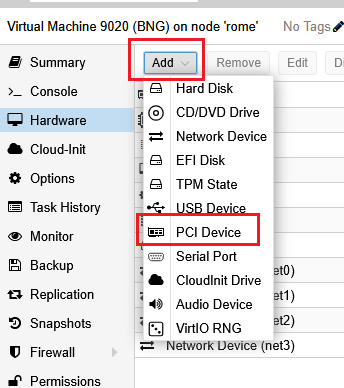
Now the VM is created, we still need to add our VF to it, so click on your VM name, then “Hardware”
Finally click “Add” then “PCI Device”
The window that open allow us to select one of the VF previously created, for example :
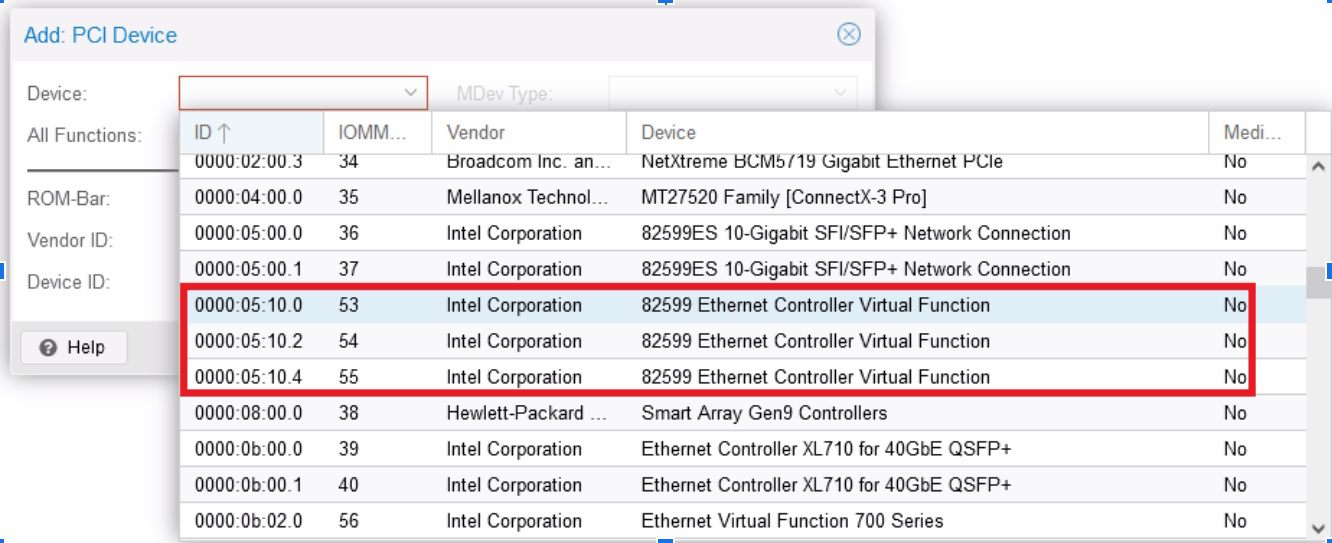
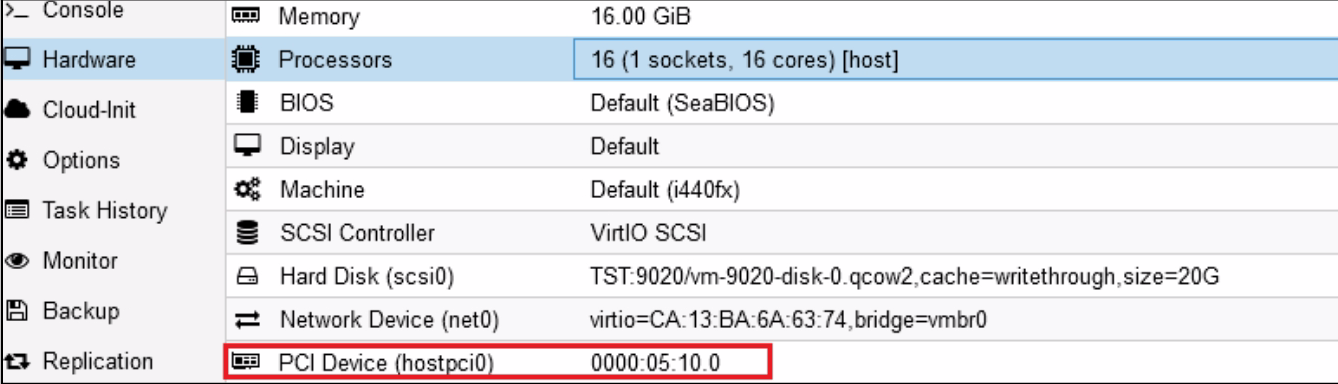
Select one then leave other box unchanged, validate, the VF is now added to the VM :
Set CPU Pinning for maximal performance
CPU pinning is crucial with VSR to get maximum performance, Proxmox allows you to fix CPU cores given to a VM.
Click on your VM name, then “Hardware”, then “edit” the “Processors” item :
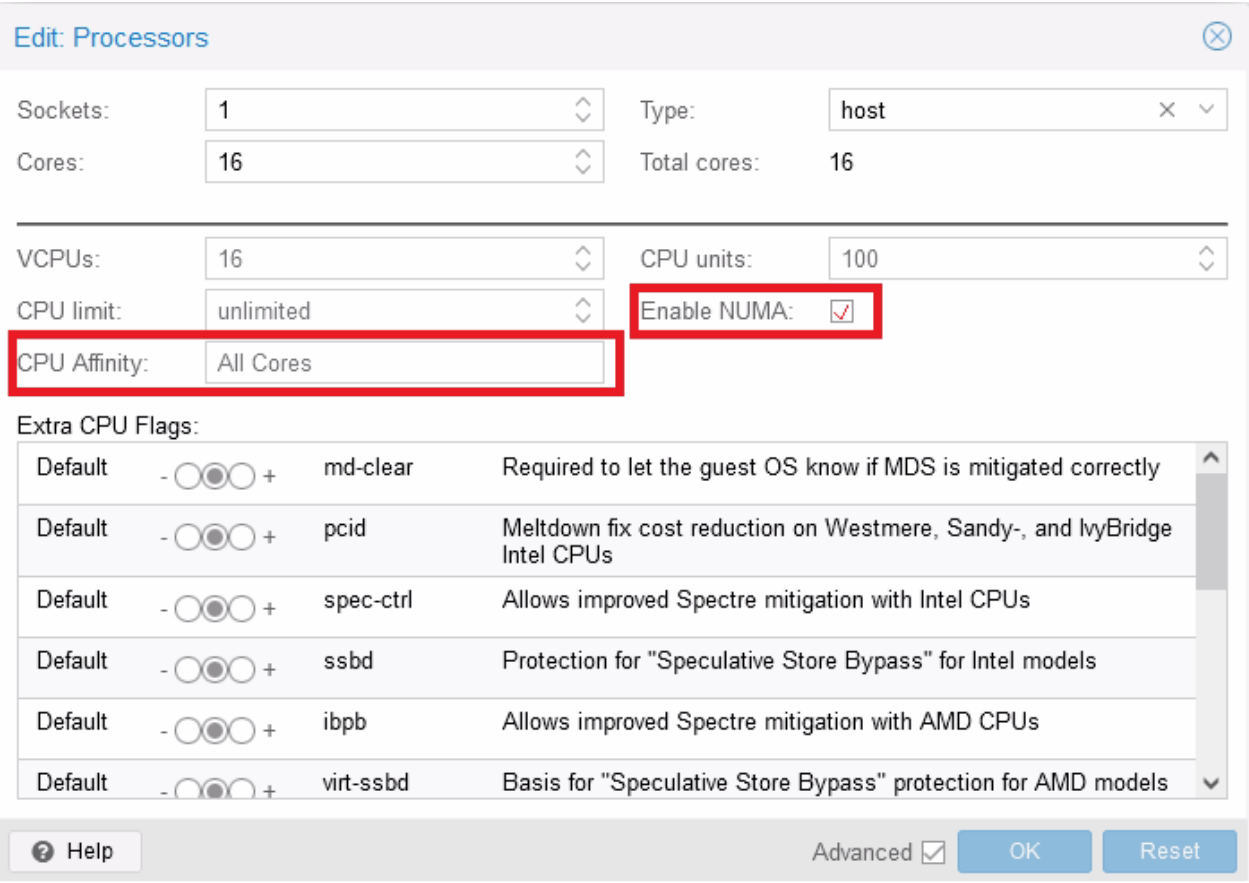
First, set “Type” to “host” to obtain best performances.
Here, as an example, you can specify to give the first four cores (0-3) of your host server to the VM, if you have multiple CPU on your server, be sure to enable “Enable NUMA”.
Most important thing is to give cores from the same NUMA node to the same VM and to ensure that the NICs are also connected to this same NUMA node. You can get your NUMA pattern by logging to the Proxmox server then issuing the following command :
root@rome:~# lscpu | grep NUMA
NUMA node(s):            4
NUMA node0 CPU(s):       0-7,32-39
NUMA node1 CPU(s):       8-15,40-47
NUMA node2 CPU(s):       16-23,48-55
NUMA node3 CPU(s):       24-31,56-63
For example, here, DO NOT give core 6-12 to one VM, as they will be spanned across two different physical nodes (0 and 1), hence reducing the performance.
Install Virtual Service Router
Warning
Please carefully check the device associated to the disk you want to use, or
you could wipe the wrong drive in the next step. When following this
installation guide you have only one disk attached to the VM. Thus the
device name is sda. If you attach additional virtual disks, make sure to
choose the right device.
Warning
Please make sure that there is no other Virtual Service Router live CDROM or live USB inserted in this VM. Otherwise the system might fail to boot properly.
Press Start in the top right corner to actually start the VM.
Note
Please make sure to select this disk as boot device after installation. You can access boot menu by pressing ESC at startup in the VM console.
Once the VM has booted on the .iso file, select it in the left pane of the
main dashboard and press the >_ Console button to get access to the serial
console.
Log in as admin, password admin, and at the prompt, do:
vsr> cmd system-image install-on-disk sda
This command will install Virtual Service Router on /dev/sda. The relevant configuration
files will be copied to the local drive.
Note
To restore from a backup file, add backup-url <url> to the previous
command. This will restore your configurations, private keys,
certificates and licenses.
The backup file must have been generated on the same or previous minor version (e.g. a backup from 3.0.1 can be restored on 3.0.x or 3.1.x).
Reboot to finally boot Virtual Service Router from the virtual hard disk:
vsr> cmd reboot
The next step is to perform your first configuration.