2.2.3. Install on bare metal using PXE
This chapter explains how to deploy Turbo IPsec on a set of physical machines via PXE and make them available for remote access (e.g. SSH, Ansible, etc.).
The procedure relies on the Turbo IPsec iso file and requires a deployment
infrastructure enabling PXE by providing DHCP, TFTP, DNS and HTTP services.
Install a PXE server
This section describes the installation and the configuration of the required packages on an Ubuntu 16.04 server to provide DHCP, DNS, TFTP and HTTP services for PXE.
First, install the required packages as root:
# apt-get update
# apt-get install -y apache2 apache2-bin apache2-data apache2-utils dnsmasq \
   dnsmasq-base grub-common grub-pc grub-pc-bin grub2-common
Configure the network interface that will answer DHCP requests in
/etc/network/interfaces (adapt address and netmask to your environment):
[...]
auto eth1
iface eth1 inet static
    address 192.168.235.1
    netmask 255.255.255.0
[...]
And bring this interface up:
# ifup eth1
Then, configure dnsmasq to provide DHCP, DNS and TFTP services for your
network. Edit /etc/dnsmasq.conf with the following contents:
# vi /etc/dnsmasq.conf
# Listening interfaces
interface=eth1
# DNS configuration
bogus-priv
no-hosts
domain=pxeserver.com
# DHCP configuration
dhcp-range=192.168.235.10,192.168.235.150,12h
dhcp-host=14:18:77:66:c7:23,host1,192.168.235.13,infinite
dhcp-host=52:54:00:12:34:57,host2,192.168.235.36
dhcp-boot=boot/grub/i386-pc/core.0
# TFTP configuration
enable-tftp
tftp-root=/var/lib/tftpboot
See also
the dnsmasq man page for more information about the configuration options.
Create the root directory for the TFTP server:
# grub-mknetdir --net-directory=/var/lib/tftpboot
Note
in the rest of this document, /var/lib/tftpboot will be referred to
as $TFTP_DIR.
Then, restart the dnsmasq service:
# systemctl restart dnsmasq
Finally, configure the apache2 HTTP server.
Edit the default configuration file in
/etc/apache2/sites-available/000-default.conf:
<VirtualHost *:80>
        ServerAdmin webmaster@localhost
        DocumentRoot /var/www/html
        ErrorLog ${APACHE_LOG_DIR}/error.log
        CustomLog ${APACHE_LOG_DIR}/access.log combined
        RewriteEngine On
        RewriteRule ^/cloud-init/(.*) /%{REMOTE_ADDR}/$1
</VirtualHost>
Note
in the rest of this document, /var/www/html will be referred to
as $HTTP_DIR.
Enable the URL rewriting module:
# a2enmod rewrite
Then, restart apache2:
# systemctl restart apache2
You are now ready to configure the PXE server.
Configure the PXE server
This section describes how to use the Turbo IPsec deliverables and the PXE server together to finalize the PXE infrastructure.
First, copy the Turbo IPsec deliverables into the proper directories.
Kernel and filesystem of the installer:
# cp vmlinuz initrd.img $TFTP_DIR/
Turbo IPsec ISO image:
# cp 6wind-turbo-*.iso $HTTP_DIR/turbo.iso
Then, create the $TFTP_DIR/boot/grub/grub.cfg file that will be provided to
PXE targets:
# vi /var/lib/tftpboot/boot/grub/grub.cfg
set timeout=5
menuentry 'Turbo IPsec network installer' {
        set root='(pxe)'
        set kernel_image="/vmlinuz"
        set ramdisk="/initrd.img"
        set boot_opts="ro rd.debug console=tty1 fsck.mode=skip"
        set boot_opts="$boot_opts BOOTIF=01-$net_default_mac boot=live nonetworking console=ttyS0,115200n8 splash"
        set boot_opts="$boot_opts live-media-path=/iso/"
        set boot_opts="$boot_opts persistence persistence-storage=directory,filesystem persistence-path=/iso/ persistence-label=ramdisk_Data"
        set boot_opts="$boot_opts fetch=http://$pxe_default_server/turbo.iso ds=nocloud-net;s=http://$pxe_default_server/cloud-init/"
        echo "Boot options: $boot_opts"
        echo "Loading kernel image $kernel_image ..."
        linux $kernel_image $boot_opts
        initrd $ramdisk
}
See also
the GRUB documentation for more information about the configuration options.
Next, prepare per-target cloud-init configurations. The previous configuration
will make targets retrieve their respective cloud-init meta-data and user-data
configurations from $HTTP_DIR/$CLIENT_IP, $CLIENT_IP being the address
assigned to the host by DHCP.
# mkdir $HTTP_DIR/$CLIENT_IP/

# cat > $HTTP_DIR/$CLIENT_IP/meta-data <<EOF
instance-id: host1
local-hostname: host1
EOF

# cat > $HTTP_DIR/$CLIENT_IP/user-data <<EOF
#cloud-config

users:
 - name: root
   lock_password: true
   ssh_authorized_keys:
    - ecdsa-sha2-nistp256 AAAAE2VjZHNhLXNoYTItbmlzdHAyNTYAAAAIbmlzdHAyNTYAAABBBNqR+NMuQUywXp5+uqSc6WSFjxLRpRZoA9b7ekBeL9FRKiX3LztZA9SjJ8ibfKZIHgsUNRLoTe7VKcBDr+cfotM=

runcmd:
 - '/usr/bin/wget "http://192.168.235.1/cloud-init/vrouter.startup" -O /etc/sysrepo/data/vrouter.startup'
 - '/usr/bin/install.sh -r -d /dev/sda'
 - '/sbin/reboot'
EOF
This user-data file aims at:
disabling password access and installing an authorized public SSH key for the root user for security reasons,
retrieving a startup Turbo IPsec configuration from the HTTP server (see below),
performing the installation on the given
/dev/sdadisk,rebooting.
# cat > $HTTP_DIR/$CLIENT_IP/vrouter.startup <<EOF
{
  "vrouter:config": {
    "vrouter-system:system": {
      "hostname": "host1",
      "vrouter-auth:auth": {
        "vrouter-embedded:default-users-enabled": false,
        "user": [
          {
            "name": "admin",
            "role": "admin",
            "authorized-key": [
              "ecdsa-sha2-nistp256 AAAAE2VjZHNhLXNoYTItbmlzdHAyNTYAAAAIbmlzdHAyNTYAAABBBNqR+NMuQUywXp5+uqSc6WSFjxLRpRZoA9b7ekBeL9FRKiX3LztZA9SjJ8ibfKZIHgsUNRLoTe7VKcBDr+cfotM="
            ]
          }
        ]
      }
    },
    "vrf": [
      {
        "name": "main",
        "vrouter-interface:interface": {
          "physical": [
            {
              "name": "mgmt0",
              "ipv4": {
                "dhcp": {
                  "enabled": true
                }
              },
              "port": "pci-b0s8"
            }
          ]
        },
        "vrouter-ssh-server:ssh-server": {
          "enabled": true,
          "port": 22
        }
      }
    ]
  }
}
EOF
This startup configuration:
sets host1 as the hostname,
disables Turbo IPsec default users and passwords for security reasons and configures an
adminuser withadminrole and a SSH key,configures a management interface in
mainvrf with DHCP enabled.
You can now deploy Turbo IPsec.
Deploy Turbo IPsec on the target
You target must be configured to boot in Legacy BIOS mode (UEFI is not supported) and first on the hard drive selected for installation.
To start the installation, configure the target to boot using PXE. For example, using an IPMI request to perform a PXE installation on next boot only:
# ipmitool -I lanplus -H <BMC_IP> -U <user> chassis bootdev pxe
# ipmitool -I lanplus -H <BMC_IP> -U <user> chassis power reset
On boot, the target will perform the following tasks:
retrieve an IP address, a hostname and the TFTP server address through DHCP,
boot the Turbo IPsec installer kernel and initrd, using the Turbo IPsec
isoas root filesystemexecute the cloud-init script to:
configure the root account (no password, SSH key)
install Turbo IPsec locally on the target disk device
install the startup configuration
reboot
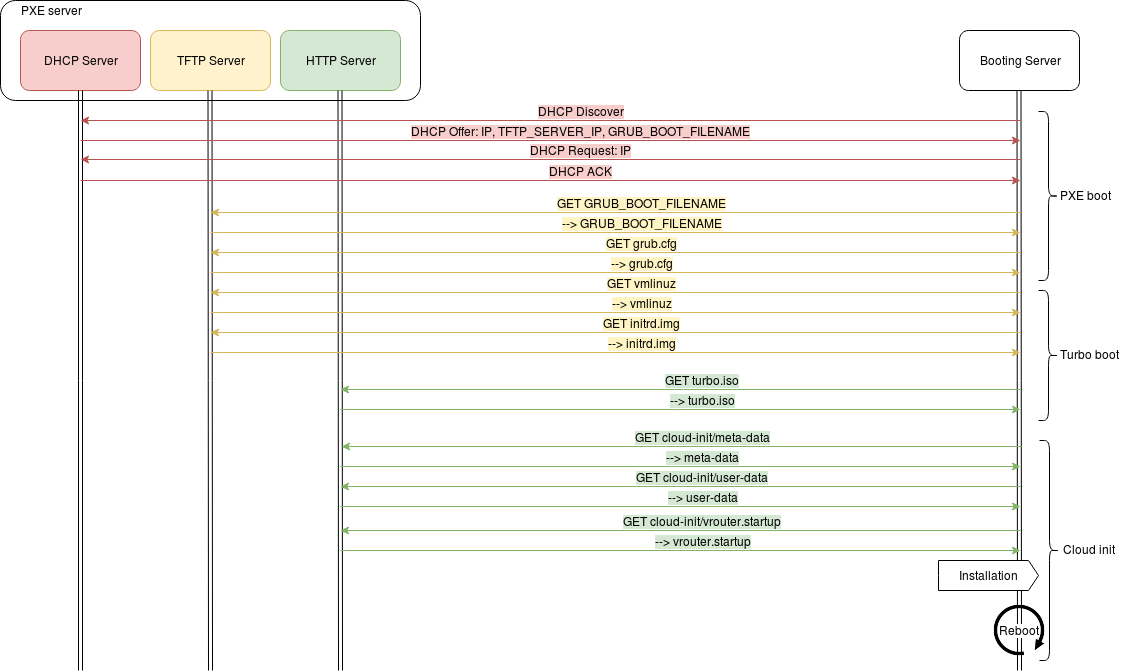
On reboot, the normal boot sequence of the server will boot on the freshly installed hard drive, now running Turbo IPsec.
Thanks to the startup configuration, an IP address will be obtained on the first network interface and the console will be accessible through SSH. At this step, it is possible to automate other deployment tasks, for example using Ansible.
The next step is to perform your first configuration.